Appointment Cards for Salons, Clinics and Service Businesses: What to Include
Appointment card printing gives salons, clinics and service businesses a practical way to share booking details while keeping their brand visible. A well-designed appointment card helps customers remember their next visit, find contact information and know how to rearrange a booking if necessary.
Whether you run a hair salon, beauty business, dental practice or consultancy, the key is to make your cards easy to read, simple to complete and consistent with your existing branding. If you are looking for professionally printed appointment cards, choose a layout that makes booking details clear and easy to read.
This guide explains what to include on appointment cards, how to organise the layout and what to consider before ordering printed appointment cards for your business.
What Is an Appointment Card?
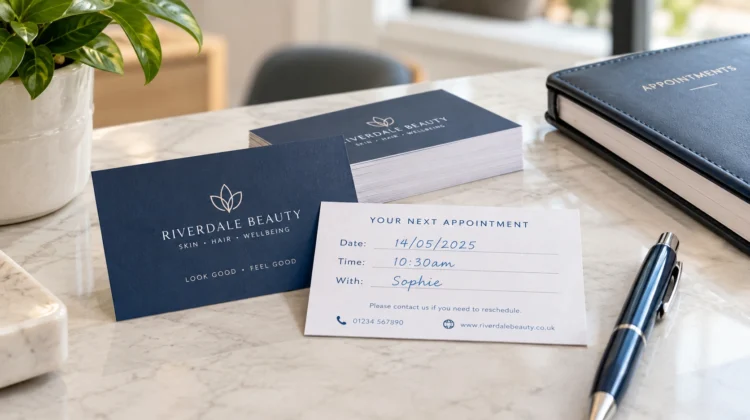
An appointment card is a small printed card that records the details of a customer’s upcoming appointment. It commonly includes the business name, contact details, appointment date and time, along with space for handwritten information.
Businesses use appointment reminder cards to give customers a physical reference they can keep in a wallet, purse or another convenient place. Unlike a promotional leaflet, an appointment card focuses on essential booking information rather than a large amount of marketing content.
For businesses that arrange repeat visits, appointment cards can also provide a consistent branded experience after each booking.
What Should an Appointment Card Include?
An effective appointment card should make the next booking easy to understand at a glance. Include the details customers need and leave enough space for staff to complete the card accurately.
1. Business Name and Logo
Start with your business name and logo. These identify the company that issued the card and help maintain consistency with your other printed materials.
Use your established brand colours and fonts where possible. Keep the logo clear and avoid filling every available space with decorative elements.
You can use the same branding across your business cards and appointment cards to create a consistent professional identity.
2. Contact Details
Include the most useful way for customers to contact your business.
Depending on your needs, this could be:
- Business telephone number
- Website address
- Online booking link
- Business address
- Relevant email address
Choose details that customers can use to confirm, change or cancel an appointment. If space is limited, prioritise the contact method your customers use most often.
Check every telephone number, website address and booking link carefully before approving the final artwork.
3. Appointment Date and Time
The appointment date and time are usually the most important handwritten details.
Provide clearly labelled fields such as:
- Date: __________________
- Time: __________________
- With: __________________
Include AM or PM when using a 12-hour clock. Writing the day of the week alongside the date can also help make the booking easier to recognise.
Make the writing areas large enough for ordinary handwriting. Avoid placing decorative patterns, small text or busy backgrounds behind these fields.
4. Staff Member or Service Details
Some businesses benefit from recording the name of the person the customer will see.
For example, a salon might include a stylist’s name, while a consultancy could record the relevant adviser. Add a service field only when it is useful and appropriate.
For healthcare-related businesses, consider privacy carefully. A generic appointment reminder may be more suitable than writing sensitive treatment details on a card that could be seen by other people.
5. Rescheduling Information
Customers may need to change their plans. A short, clear instruction can show them what to do next.
For example:
“Need to change your appointment? Please contact us using the details above.”
If your business has a cancellation policy, you can include a brief reminder, provided the wording accurately reflects your actual policy.
Avoid adding lengthy terms and conditions that compete with the date and time for attention.
How to Design Appointment Cards for Different Businesses
The best appointment card layout depends on how your business works and what your customers need to remember.
Appointment Cards for Salons and Beauty Businesses
Salons, barbers and beauty businesses can use a visually appealing design that reflects their brand. Include the business name, contact details, appointment date and time, and the relevant stylist or practitioner if needed.
A short website or booking link can make it easier for customers to arrange another visit.
For businesses that encourage repeat visits, printed loyalty cards can complement appointment cards as part of your business stationery.
Keep the layout uncluttered. Decorative colours and graphics should support the information rather than make the booking details harder to read.
Appointment Cards for Clinics
Clinics and healthcare-related practices should prioritise clarity, accurate booking information and discretion.
Include the practice name, appropriate contact details, date and time fields, and any other essential administrative information. Avoid unnecessary personal or sensitive information, especially if the customer will carry the card in public.
Use a straightforward layout with readable text and enough room to write the appointment details.
Appointment Cards for Other Service Businesses
Consultants, repair services and other appointment-based businesses can adapt the same principles to their workflows.
Consider whether customers need a staff member’s name, a location, a telephone number or a link to manage bookings. Include only the fields that serve a clear purpose.
A practical design is generally more useful than a card crowded with promotional messages.
Should You Print on One Side or Both Sides?
Single-sided and double-sided appointment cards can both work well. The right choice depends on how much information you need and how customers will use the card.
Single-sided printing can suit a simple design with branding, contact details and appointment fields together on one side.
Double-sided printing gives you more room to separate branding from the appointment details. For example, one side can display your logo and contact information, while the reverse contains labelled spaces for the date, time and staff member.
If you choose double-sided printing, ensure that the writing area is easy to find and that the reverse does not become overcrowded.
Choosing Paper and a Writable Finish
The paper and finish affect how practical your appointment cards are in everyday use.
If staff will write appointment details by hand, choose a surface that accepts the pen or ink you intend to use. Uncoated stock is often a sensible starting point because it generally provides a suitable writing surface.
Coated or laminated finishes may be attractive, but some can make handwriting difficult or cause ink to smear. Check the available product specifications and test a sample if you are unsure.
Also consider the card’s durability. Customers may keep appointment cards for days or weeks, so the material should suit normal handling and storage.
Before ordering, confirm the available sizes, paper options, finishes and printing arrangements for your chosen product.
A Simple Appointment Card Checklist
Use this checklist before sending your design for printing.
- Business name and logo are correct.
- Contact details have been checked.
- Date and time fields are clearly labelled.
- Enough space is available for handwriting.
- Staff or service fields are included only if needed.
- The writing surface suits the intended pen or ink.
- Text is readable against the background.
- Important information sits safely inside the trim area.
- Any booking link or QR code has been tested.
- The final proof has been checked for spelling and layout errors.
A careful review helps prevent avoidable mistakes and makes the finished card more practical for staff and customers.
How to Order Appointment Card Printing
Before ordering appointment cards, decide what information needs to appear on the card and whether you require single-sided or double-sided printing.
Next, prepare your artwork using the printer’s current specifications. Check the finished size, image resolution, colour requirements, bleed and safe area. If you are supplying a QR code, scan it from the proof to confirm that it leads to the correct destination.
Review the final proof carefully before approving production. Check the logo, contact information, spelling, handwritten fields and overall readability.
You can also explore our business stationery options to keep your printed materials consistent with your brand.
At iFix Prints, you can explore the appointment cards product page to review the available options and the ordering information provided for the product.
If you need help with your printing requirements, contact iFix Prints for further information.
Choosing a suitable layout and writable surface helps you create appointment cards that support everyday bookings while keeping your business identity visible.
Frequently Asked Questions
What should an appointment card include?
An appointment card should usually include the business name, logo, contact details and space to write the appointment date and time. Depending on the business, you may also include a staff member’s name, address or booking link. Keep the information relevant, readable and appropriate for the customer’s privacy.
How can appointment cards help customers remember bookings?
Appointment cards give customers a physical record of their next booking that they can keep in a wallet, purse or another convenient place. Clear date and time fields make the details easier to check. They can complement digital reminders, although a printed card alone cannot guarantee that customers will attend.
What is the best finish for appointment cards?
If appointment details will be handwritten, a writable surface is important. Uncoated stock is often a useful option, but suitability depends on the pen or ink being used. Check the printer’s product specifications and test the proposed finish if necessary before placing a larger order.
Should appointment cards be printed on both sides?
Single-sided printing can work for a simple design, while double-sided printing provides extra room for contact details, branding and appointment fields. Choose the format that keeps the most important information clear without overcrowding the card.
Can appointment cards include an online booking link or QR code?
A QR code can direct customers to an online booking page or another relevant destination. Test the code before printing and provide a readable website address or another contact method where practical.
Are appointment cards suitable for small businesses?
Salons, consultants, repair businesses and other service providers can adapt appointment cards to their booking processes. The most useful design includes the information customers need without adding unnecessary fields or promotional content.
How do I prepare appointment card artwork for printing?
Follow the printer’s current artwork guidelines for size, bleed, safe margins, resolution and colour settings. Check all text and contact details, confirm that the writing areas are large enough, and review the final proof before approving the job.
Conclusion
Well-designed appointment cards combine clear booking information with consistent business branding. By prioritising readable date and time fields, accurate contact details and a suitable writing surface, you can create a practical reminder for customers across salons, clinics and service businesses.
Before ordering, review your layout, check the artwork specifications and confirm that every field serves a purpose. Explore iFix Prints appointment cards to review the product information and consider the options for your business stationery.